Why “the driver looked it over” isn’t enough
A vehicle or a forklift that gets driven with a bad brake, a cracked fork, or a defective coupling device doesn’t announce it in advance — the inspection is what’s supposed to catch it first. But an inspection that lives only in someone’s head, or gets done once and forgotten, doesn’t close the loop: it finds the defect and then loses track of it. Documenting the inspection is what turns “someone probably checked” into a record you can point to — one asset, one shift, one defect, one repair, one sign-off.
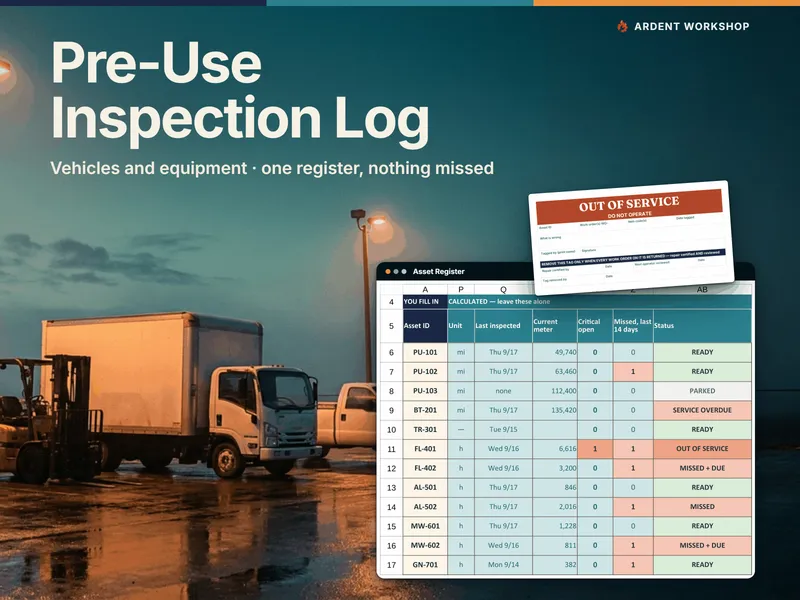
That’s the shape the Vehicle & Equipment Pre-Use Inspection Log is built around: one register for odometer vehicles and hour-meter equipment together, so you can see per asset and per shift which inspections happened, which didn’t, and which turned up a defect nobody closed out yet.
If you just want to start checking something tomorrow morning, the free daily vehicle inspection checklist is a single printable page for one vehicle, pre-filled with a worked example. It has no register, no defect tracker and no out-of-service flags — it’s the walk-around, not the follow-up. The steps below are the whole loop.
Step 1 — Check the vehicle before you drive it
A pre-trip inspection is a walk-around against a fixed list, not a glance. For a commercial motor vehicle under FMCSA rules, the driver vehicle inspection report (DVIR) framework at 49 CFR 396.11 covers, at minimum: service brakes (including trailer brake connections), the parking brake, the steering mechanism, lighting devices and reflectors, tires, the horn, windshield wipers, rear-vision mirrors, coupling devices, wheels and rims, and required emergency equipment. Run a post-trip check at the end of the day too — that’s when a defect that developed during the shift actually gets found.
Whether 396.11 applies to you is worth checking, not assuming. It covers commercial motor vehicles operated by motor carriers under FMCSA rules, and there are exemptions (some single-vehicle operations, for one). A pickup or van used for local contracting work isn’t automatically covered just because it’s a vehicle used for business — confirm your own status before you treat this list as a legal requirement rather than good practice.
Step 2 — Record what’s wrong, by item
When you find something, write down which item and what’s wrong with it — “left rear tire, sidewall bulge,” not “truck needs a look.” A fixed code per item is what makes the record useful later: mark it FL-02 on the workbook, the same FL-02 on a printable tear-off pad, and a repair note that references FL-02 closes the exact defect that was opened, not a vague one. Loose descriptions are how a real defect gets lost between the person who found it and the person who’s supposed to fix it.
One thing worth knowing: no written report is required when no defect is found or reported. The DVIR requirement exists to document problems, not to generate paperwork on a clean day — so the record you’re keeping is defects and their resolution, not a daily form for its own sake.
Step 3 — Take anything critical out of service
Not every defect is the same. A defect on a critical item — brakes, steering, a coupling device, anything that would affect safe operation or cause a breakdown — means the asset comes out of service now, with a tag or a flag that the next person can’t miss and can’t talk themselves past. It stays out of service until the repair is done and certified. Holding the asset like that is a house rule rather than a line you’ll find in 49 CFR 396.11 — what the rule requires is the repair and certification before the vehicle is operated again — but it’s the practice that actually prevents an incident, and it’s the one that’s easiest to skip under schedule pressure. Which is exactly why it needs to be a flag in the record, not a judgment call made fresh each time.
Step 4 — Repair it, then certify the repair
Before the vehicle is operated again, the carrier has to repair the defect (if it’s likely to affect safe operation) and certify on the report — either that the repair was made or that it wasn’t necessary. That certification is the carrier’s duty, not the driver’s, and it’s what closes the loop: a defect note with no certification behind it is an open item, whatever anyone remembers about fixing it. If your repair process runs through a third-party shop, the certification is also the record that proves the work actually happened before the truck went back out.
Step 5 — Have the next driver review it
Before driving, the next driver should be satisfied the vehicle is in safe operating condition, review the last report if one was required, and sign to acknowledge that review whenever a defect was noted and certified. That signature is a second set of eyes on the repair — it’s what catches the rare case where a certified repair didn’t actually hold, before the vehicle is back on the road with the same defect.
Step 6 — Run the same discipline for hour-meter equipment
Vehicles aren’t the only assets that need a before-use check. For powered industrial trucks like forklifts, OSHA’s standard (29 CFR 1910.178) requires an examination before the truck is placed in service, at least daily, and after each shift for equipment that runs around the clock — and a truck found unsafe is taken out of service until it’s restored to safe condition. OSHA does not require that examination to be written down; a written log is proof and good practice, not a legal requirement. See the forklift pre-shift inspection checklist for the visual-then-operational split that examination actually runs on. Aerial lifts, mowers, and generators belong on the same before-use, take-out-of-service pattern whatever rule does or doesn’t name them — check what covers the equipment you run, and keep the habit either way.
Step 7 — Keep the record
Retain the inspection report and its repair certification for as long as your rule requires — for the DVIR framework, that’s three months from the date the report was written. Keep the vehicle records and the hour-meter equipment records together rather than in separate piles: a reviewer trying to see the whole fleet’s status needs one place to look, not one binder per asset type.
Do it in a workbook you own
You can run all of this from a blank spreadsheet — or start from one built for exactly this. The Vehicle & Equipment Pre-Use Inspection Log is one register for odometer vehicles and hour-meter equipment together: it computes, per asset and per shift, which inspections were missed; turns every failed item into a work order; keeps any asset with a critical defect flagged OUT OF SERVICE until the repair is certified and reviewed; and its printable tear-off pads use the same item codes as the workbook, plus an out-of-service tag, so a paper check in the cab and the digital record agree. It works in Excel, Google Sheets and LibreOffice Calc and ships with printable PDFs — one price, not a per-asset monthly fee. If you’d rather prove the habit sticks first, run the free printable checklist on one truck for a couple of weeks and add the register when the paper starts piling up.